Microsoft Teams is the new normal for office communications now that we can no longer go down the hall or congregate over the coffee pot to speak with coworkers. Microsoft Teams, like most other communication systems, allows users to exchange instant messages (IMs) and conduct phone conversations, but it also has a lot of additional features. Here are some time-saving strategies for using Microsoft Teams:
🔹Take use of the Command Bar
The top-right search box doubles as a command bar. When you use ctrl+e in Teams, your cursor will be moved to the command bar. To view a list of things you can do, press /.
For example, to set your status to away, write /away and then press enter. When you return, type /available and hit enter to restore your availability. /chat is the command I use the most. This allows a user to send a message to someone from within the search bar, eliminating the need to leave the current screen. Another important command is /saved, which displays a list of messages that have been saved.
🔹Change the name of a Group Chat
If you're anything like me, you have a half-dozen group conversations with the same team members. Rename your group conversations for convenience of use so you can know which group or topic the discussion is about at a glance.
Go to the upper left corner of the group chat to find the participant names. When you click the pencil symbol, a box appears where you can input a group name. Then, instead of looking for all of the group members individually, you simply search for the group name the next time you wish to contact them.
🔹Use Members Tags for Faster Messaging
You may establish a label that applies to a certain group of individuals so that you can deliver the same message to a large number of people at the same time. Locate the team for which you wish to create a tag in the Teams tab. Manage Tags may be accessed by clicking the ellipsis to the right of the team name. Create a tag and apply it to people. A team can have up to 100 tags, a tag can have up to 100 team members attached to it, and a single user can have up to 25 tags allocated to them.
🔹Make sure your "Buddy List" is in order.
The Chat area may be customized in a number of ways. To begin, pick between Chat and Contacts by clicking the down carrot next to the word Chat. From newest to oldest, Chat shows you a glimpse of the discussions you're having. Contacts resembles the Skype for Business contact list in appearance, and you may organize individuals into groups and sort them in any way you like.
🔹Make Notifications Your Own
Customizing your alerts is a more permanent approach to limit how often you're disturbed. If you don't want to get a specific sort of notice or want to receive it in a different format (banner pop-up vs. email), you can change your notification settings by clicking on the ellipsis next to your image in the upper right hand corner, selecting Settings, and then Notifications.
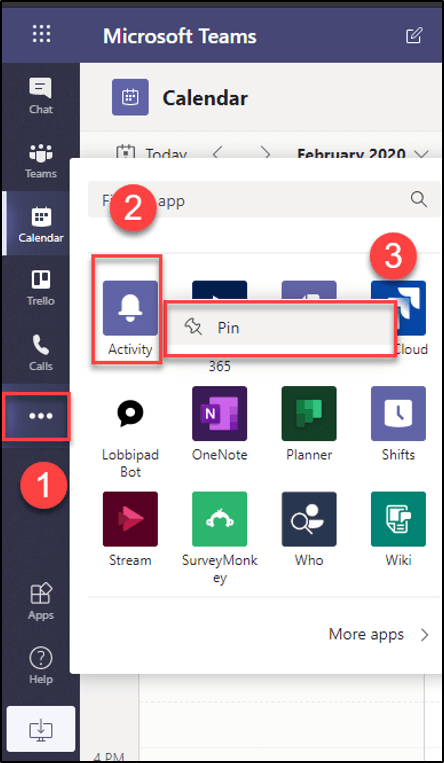
🔹Apps should be pinned.
Pinning your most-used applications to the left-hand side is another option to personalize your Teams experience. You may do this by right-clicking on the program and choosing Pin or Unpin from the menu that appears. You may drag and drop the applications on the left side to reorder them. You won't have to go to "More Apps" to discover the apps you use on a daily basis this way.
🔹Shortcuts on the Keyboard
I've written about this subject previously, but it bears repeating. Keyboard shortcuts may make or break a game. Ctrl+Period is the most crucial keyboard shortcut to remember. This shows up a list of all keyboard shortcuts when used from within Teams!
There are over 50 Teams Keyboard Shortcuts to choose from, so spend some time looking over the list to see which ones will save you the most time. Write a few down and pin them to your monitor until you've learned them so you can use them more easily.
🔹Buttons for Navigation
I've only lately learned about the Navigation Buttons, and I'm quite eager to put them to use. Every week, I have a check-in meeting that necessitates switching between two distinct Teams displays. To navigate from screen to screen before discovering the Navigation buttons, I had to go back to the Team site.
I can now smoothly move between the two programs I require by just clicking the > arrows in the upper left-hand corner. If you click out to talk with someone, you may utilize this to return to what you were doing. You may get back to where you were by pressing the button.
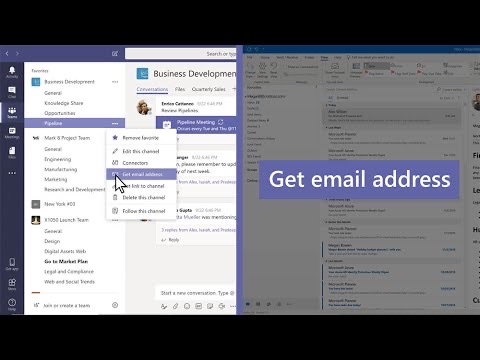
🔹Send an Email to a Group of People
Assume you have a team called "People Who Are Attending Conference Z" and you need to send a message to the entire group without individually adding each person to an email. You may email the entire team at once by choosing Get email address from the ellipsis to the right of the team name.
You may also utilize this functionality to automatically upload files to the Team. Send an email to the Team email address with the file attached, and it will show on the Posts tab. You may also transmit data the other way by selecting Share to Outlook from the ellipsis on each individual chat message.
🔹Images for Custom Channels
Last but not least, you may create your own channel icons! By including an icon in the name of a channel or conversation, you may draw more attention to it. All you have to do is change the name of the team or group and add a Unicode character. Keep in mind that the icons you pick will be visible to everyone.